twitter
    Find out what I'm doing, Follow Me :)

Monday, June 20, 2011

Currently Online Readers Widget


tracker
Show off your blog's currently online readers in real time. When clicked on, this live widget will display which pages are being currently read by displaying the URLs. It's really easy to install, just Copy and paste the code from Whos.amung.us into your blog. Supposedly the code is suppposed to be on every page of your site, but it worked find for me in my blog post as you can see above. Go ahead and give the button above a click, and hopefully you will be able to see how popular this site is :)
Get this widget

Addthis Social Bookmarking Widget


AddThis
Bookmark and Share
AddThis spreads your content across the Web by making it easier for your visitors to bookmark and share it with other people, again…and again…and again. This simple yet powerful button is very easy to install and provides valuable statistics about the bookmarking and sharing activity of your users. AddThis is the perfect tool to help your visitors create a buzz for your site and increase its popularity and ranking.
Get this widget

Change the Title Tags in Blogger for More Search Engine Traffic


By default Blogger displays the blog title first, followed by the name of the post. As you might notice this is not good when it comes to SEO. It's important for the name of the post to come before the name of your blog, especially when it comes to google search results. Learn how to make your post title show up first so that you can reel in more traffic from the search engines.


Why Change the Titles?

It's quite important to have the Post Title + Blog Title arranged accordingly because this is how you would want your blog to be displayed on google's search results. This way more people will click on your link when searching google because the post title is more relevant than your post name.
Example Google Search Results:
You are most likely to click on the bottom image when searching google for the keywords "image reflection generator". The reason being is that your mind reads text from left to right. So it makes sense to have the more important title on the left.


How to Change the Titles:

  1. Go to Layout>edit HTML in your Blogger dashboard.
  2. Search for this tag: <title><data:blog.pageTitle/></title>
  3. Replace this tag with the following code:
  4. <b:if cond='data:blog.pageType == &quot;index&quot;'> <title><data:blog.title/></title> <b:else/> <title><data:blog.pageName/> | <data:blog.title/></title> </b:if>
  5. Save your template and you should see the results in your web browser as depicted in the images below.
  6. It may take a few days for the changes to show up on the google search results. I guarantee you that you will start receiving more traffic from google once you are re-indexed!

How to Change the Favicon in Blogger


Blogger supplies every blog with the standard orange "B" blogger favicon. Having your own unique favicon is a great way to give your blogger template both a distinct and explicit brand. These small 16X16 pixel images will most definitely help your blog stand out from the rest of the blogspot blogs.


What is a Favicon?

A favicon is a small 16X16 image located at the top of your browser in the url bar.

How to Change your Favicon

  1. First go to Layout >Edit HTML in your Blogger Dashboard.
  2. Backup your existing template before making any changes!
  3. Place the code below directly below the </head> tag in your template.
  4. <link href='http://bsaves.com/HowHero/Blogger%20Templates/moonspot/images/favicon.ico' rel='shortcut icon' type='image/vnd.microsoft.icon' /> <link href='http://bsaves.com/HowHero/Blogger%20Templates/moonspot/images/favicon.ico' rel='icon'/>
  5. Now save your template.
  6. Once your template is saved view your blog and make sure to refresh the page and delete your cookies.

Creating your own Favicon

  1. Replace the image URL (2X) with your own 16 pixel by 16 pixel image hosted on the internet.
  2. http://bsaves.com/HowHero/Blogger%20Templates/moonspot/images/favicon.ico
  3. You can host your own favicon blogger image at sites such as ImageShack; PhotoBucket; Flickr; etc.
  4. Check out this Favicon Generator Tool which allows you to upload an image and it will format it for you!

Attractive Feedburner Email Subscription box for blogger

Email Subsciption Box


<!-- Email subsciption box -->
<form id="subscribe" action="http://feedburner.google.com/fb/a/mailverify" method="post" target="popupwindow" onsubmit="window.open('http://feedburner.google.com/fb/a/mailverify?uri=Your-FeedBurner-Feed ', 'popupwindow', 'scrollbars=yes,width=550,height=520');return true"><b>Like This Blog's Posts?</b> Get the Latest of It Directly from your Inbox for Free - Enjoy your Day!<br />
<div style="text-align:center">
<input type="text" value="Enter your email address..." id="subbox" onfocus="if (this.value == &#39;Enter your email address...&#39;) {this.value = &#39;&#39;;}" onblur="if (this.value == &#39;&#39;) {this.value = &#39;Enter your email address...&#39;;}" name="email" style="width:250px;" />
<input type="hidden" value="Your-FeedBurner-Feed " name="uri" />
<input type="hidden" name="loc" value="en_US" />
<input type="submit" value="OK" id="subbutton" />
</div></form>

<div>
<center>
<table>
<tr> <td>
<a href="http://feeds.feedburner.com/Your-FeedBurner-Feed "><img src="http://feeds.feedburner.com/~fc/Your-FeedBurner-Feed ?bg=99CCFF&amp;fg=111111&amp;anim=1" height="26" width="88" style="border:0" alt="" /></a>
</td><td>
<script type="text/javascript" language="JavaScript" src="http://twittercounter.com/embed/Your-Twitter-User-Name/111111/99CCFF"></script>
</td></tr>
</table></center>
</div>

<div style="padding-left:10px;">
<table>
<tr><td><a href="http://feeds.feedburner.com/Your-FeedBurner-Feed " target="_blank" title="Subscribe To The Latest Posts"><img style="float:left; margin-right:5px; width:20px; height:20px;" src="http://img243.imageshack.us/img243/2619/10rssicon.png" /></a><a href="http://feeds.feedburner.com/Your-FeedBurner-Feed " target="_blank" title="Subscribe To The Latest Posts">Subscribe to The RSS Feed</a>
</td></tr>
<tr><td>
<a href="Your-Facebook-Page-Url" target="_blank" title="Facebook time"><img style="float:left; margin-right:5px; width:20px; height:20px;" src="http://img163.imageshack.us/img163/8637/10facebookicon.png" /></a>
<a href="Your-Facebook-Page-Url" target="_blank" title="Facebook time">Connect via Facebook</a>
</td></tr>
<tr><td>
<a href="http://twitter.com/Your-Twitter-User-Name" target="_blank" title="Twitter time"><img style="float:left; margin-right:5px; width:20px; height:20px;" src="http://img189.imageshack.us/img189/6853/10twittericon.png" /></a><a href="http://twitter.com/Your-Twitter-User-Name" target="_blank" title="Twitter time">Follow Us on Twitter</a>
</td></tr>
</table></div>

share blog from your blog navbar


Share Posts from your Blogger NavBar
I guess most of you have removed the NavBar from your Blogger Template if you are using some custom versions of the template for your blog. Well, its now time to get back the NavBar again in your template. But not really if you don’t like to use this new feature of Blogger, which allows you to share posts directly from the NavBar. NavBar of the Blogger starting from august 27, 09, includes a "SHARE" button. This button will help you to share posts to popular social networking sites and even e-mail them directly. Social
Networking sites have been really popular and a lot many people use those medium to gain readers by sharing posts on such sites. Social Bookmarking widgets are really popular in the blogosphere and now it seems easier when the blogger itself comes with idea of including that in its NavBar. And I know many of you don’t like this blogger's idea of feature being introduced in the NavBar. Anyway, you can learn how to use this feature and things you can do with it in this post.

To use this feature it's essential that you have the NavBar in your Template. Don’t worry if you have removed the NavBar already but still interested in this feature, here is how you can add the NavBar again.

NavBar Restoring Instructions

1. From your Blogger Dashboard go to Layout > Edit HTML.
2. In most of your templates, the Blogger Navbar is not displayed just because it's hidden. Now search for this code within your Template


#navbar-iframe {
height:0px;
visibility:hidden;
display:none;
}


3. Delete this code from your template and now Blogger NavBar should be appearing in your template.
OK if you now have the Blogger NavBar in your template, you can see the "Share" button yourself in your blog.
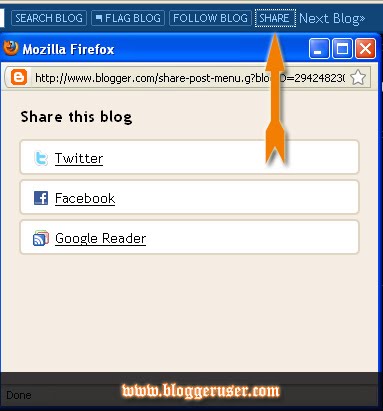
Now if you want to use this feature, you need to click on that "share Button", a pop-up menu appears with links to popular networking (sharing) sites "Facebook" and "Twitter" and also the "Google Reader". (see the Image Below). If you happen to use this feature on the item pages of your blog, you shall gain access to the "Email" feature too.
Share Posts from your Blogger NavBar
If you use this New feature of Blogger there's a hack you can try. The blogger buzz notes the hack as
"Here's a fun hack: each URL that gets shared has a specific parameter appended (?spref=nn, where fb=Facebook, tw=Twitter, and gr=Google Reader). If you're using Google Analytics to measure traffic on your blog, you can search for those strings to see how much traffic you're getting from each source." Via Blogger Buzz
happy sharing. any error in my widgets then comment . i will help u

Automatic read more with image hacked for blogger


Automatic read more with image hacked for blogger:You have to specify the number of characters after which the post will be truncated. If you select it as 500, then all your posts in the home page will show only first 500 characters.
And moreover this hack has already been modified to show the first image from the post, as a thumbnail along with the truncated post.

I called this hack as Automatic read more with image hacked for blogger, because through this hack you not only add the "Read More" tag to your posts, but it also optimizes your "Archive pages" (Feb 2008, Oct 2008, etc.) for search engines and
also for your readers.

Instructions to follow:

STEP 1:
Log in to Blogger, go to Layout -> Edit HTML, and mark the Expand Widget Templates box.

Now find (CTRL+F) this in the template code:

</head>
And immediately ABOVE/BEFORE that, paste this code:


<script type='text/javascript'>var thumbnail_mode = &quot;no-float&quot; ;
summary_noimg = 500;
summary_img = 450;
img_thumb_height = 100;
img_thumb_width = 120;
</script>
<script src='http://files.main.bloggerstop.net/uploads/3/0/2/5/3025338/read-more_auto2.js' type='text/javascript'/>
You may change the numbers in blue, as per your wish. If a post doesn't have images then the length of the summary will be 500.
If a post contains image, then text length will be 450, and the first image that will be displayed will have these dimensions:
width= 120, and
height= 100.

STEP 2:
Now again in the template, find (CTRL+F) this:


<data:post.body/>

Then REPLACE that line, with this code:


<b:if cond='data:blog.pageType != &quot;item&quot;'> <div expr:id='&quot;summary&quot; + data:post.id'><data:post.body/></div> <script type='text/javascript'>createSummaryAndThumb(&quot;summary<data:post.id/>&quot;);</script> <span class='rmlink' style='float:right;padding-top:20px;'><a expr:href='data:post.url'> read more &#8220;<data:post.title/>&#8221;</a></span> </b:if> <b:if cond='data:blog.pageType == &quot;item&quot;'><data:post.body/></b:if>

Save the template and make your readers and search bots happy !


NOTE: Although the JavaScript file has already been uploaded and linked in the code in STEP #1, but as a backup I suggest you to download and save a copy of it:

BackUp - STEP 1:
Download this file: read-more_auto.js

Download Link

BackUp - STEP 2:
Upload the file to
MyDataNest (Recommended),
NOTE: Edit & save the folder properties at your MyDataNest account as "Hidden" and NOT as "Private".
And copy the DIRECT LINK to the file.


The code

Now let us see how to customize the code to suit your style :

  • var thumbnail_mode = “no-float”;
  • By default i have selected no-float. That the image will be unformatted. If you want the thumbnail to be shown only on left use the option ” float ” instead of “no-float”.
  • summary_noimg = 500 ;
  • This code will decide how much characters must be shown in the post if that post doesn’t contain any images. I have selected 500 characters.. you can customize it to suit ur template.
  • summary_img = 400 ;
  • If the post contains image , then this code will decide how many characters must be shown in that post. Change the number of characters to be shown to suit your template.
  • img_thumb_height = 130;
  • This tag decides the height of the thumbnail to be shown in the post. Vary the number 130 to suit your template.
  • img_thumb_width = 281 ;
  • This tag decides the width of the Thumbnail image to be shown.
    ADDING READ MORE IMAGE


    The author of this hack haven’t included any read more buttons in this hack. But I have modified the code and have included a image to link to the full post. ReadMore Read More hack for Blogger with automatic Thumbnail creator script If you want to change the image then replace the url of the image with your own image or if you don’t need any read more button , then replace the code in final step to this one :

    <b:if cond=’data:blog.pageType == “item”‘> <p><data:post.body/></p> <b:else/><DIV expr:id=’”summary” + data:post.id’><p><data:post.body/></p></DIV> <SCRIPT type=’text/javascript’>createSummaryAndThumb(“summary<data:post.id/>”);</SCRIPT> <div style=’clear: both;’/><div style=’border:0px;padding-top:5px;;float:right;text-align:right;’><span class=’readon’><a expr:href=’data:post.url’ rel=’bookmark’>Read More…</a></span></div> </b:if>
    change the tag in red to suit your style.
Hope I have explained everything in this script. if you need any other modification or help please feel free to add to comments.

Redirect Blogger Blogspot into .com Domain


Blogger by default are leaving the URL domain into .blogspot.com, for user who wants to have a customized .com domain, they will most likely purchase it and redirect it into their blogspot domain, So that they will brand themselves with the .com domain

In this post, i'm going to cover the steps by steps to redirect from Blogger blogspot into .com domain. The purposes of this post was to give a blogger user a new customized .com domain


1. Go to Your Blogger Dashboard Layout, click on Edit HTML and check "Expand Widget Templates" box

2. Search for these lines
[b:include data='blog' name='all-head-content'/>

3. Add this code below it
[meta content='0;url=http://enter your new URL here' http-equiv='refresh'/>

4. Save it and you're done, try to test it with your blogspot domain and see if its redirect properly to your .com domain.


Another ways is to redirect your GoDaddy url to Blogger

1. Go to Your Blogger Dashboard, click on Publishing tab and click again on Custom Domain


2. Type in the URL of your new website in the Domain text box, don forget to change the domain into different extension, in case you are using other domain than .com

3. Login to your Godaddy Hosting account and click on Domain, click one of the domain that you would like to manage

4. On the next screen, check the domain box and you should see a new option on the right top side under the box tab that says "Total Control and MX Records link"

5. Once you see it, click on that. On the next screen, you can either add a new CName if only your host does not have WWW. Otherwise, click the existing www cname and make it point to the ghs.google.com link.

6. Go to your Command prompt (Start > Run, type cmd for WinXP and command for Win2000). Ping your blogger account by type in ping yourblog.blogspot.com. Note down the IP address that shows up

7. Next, you need to ping your .com domain. Afterward, note down the IP address that shows up.

8. Now you have to associate this IP Address with your A Host in your godaddy account. Go to the same manage domains page and your total dns control panel and edit your A Host or @ and make it point to the IP address that you noted down on step #6. If you decide to use .com domain for hosting your own blog such as Wordpress then switch back the IP Address to your .com IP address at step #7

Surprise New Facebook Comments Box For Blogger


What is the new facebook comments features.
  • Threaded comments : reply to comments.
  • User network : now it’s displaying the comment author not only name, but his profile info as well
  • Permalink to specific comments : Permalinks have now been assigned to each comment so people can share links and be directed to specific comments.
  • Notifications : sent to users will also go to the permalink, making it easier to respond. For example, clicking on the notification below will take you to the permalink of the original comment.
  • 2 Color schemes, regular light, and the new dark colors.
now let’s do it, don’t worry, i know that must of you tried to add it to blogger blogs, with no result, but today you’ll see how to add it in really easy steps and it’s 100% working. but please be careful and pay attention for all the details.
This tutorial is updated.
Step 1. Disable Default Comments.
The first thing you should do it to disable blogger default comments. because you don’t want to have 2 comments forms.
go to your blogger account, navigate to settings >> comments
and next to comments field choose Hide, then scroll down and click Save Settings
Step 2. Generate your Facebook App ID.
now you should generate your own facebook app id, it’s really easy and one step process,
just go to this page, facebook developers
then click + Set Up New Application
enter your application name, ( you can type any name )
and check agree and click Create Application
then click on Connect tab (on the left tabs-list) or see the next image.
facebook comments box for blogger
and fill the following info.
Connect URL : Enter your blog url and you must enter it with an ending dash. (for example: http://myblogname.blogspot.com/) .
Base Domain you must type blogspot.com
then click strong>agree and click Save Changes
on the next page facebook will generate you alot of info. you’ll need only one line, it’s App ID:
just copy it and keep any where, we’ll need it in the next steps. please see the following image to see where you’ll find your facebook App ID:.
facebook comments box for blogger
Step 3. Codes To Add To Your Template.
you must add the following codes to your blogger template to ensure that the comments box will work for your blog in the right way.
and in this step we’ll add the following codes,
  • xmlns attribute
  • SDK script
  • Open Graph protocol tags

  • Adding the xmlns attribute :
please go to your blogger account again, and navigate to, layout >> edit html >> and check Expand Widget Templates
then find the following code,
<html
you’ll find it on the top of your code. second or third line, and after it add the following code,
xmlns:fb='http://www.facebook.com/2008/fbml'
you must type a space before it and after it,
here is an example.
<html  xmlns:fb='http://www.facebook.com/2008/fbml'  expr:dir='data:blog..............2005/gml/expr'  >
  • Adding the SDK script Code :
search for
<body>
and after it add the following code,
<div id="fb-root"></div>
<script>
    window.fbAsyncInit = function() {
    FB.init({
      appId  : 'YOUR   APP ID',
      status : true, // check login status
        cookie : true, // enable cookies to allow the server to access the   session
      xfbml  : true  // parse XFBML
    });
  };

    (function() {
    var e = document.createElement('script');
      e.src = document.location.protocol +   '//connect.facebook.net/en_US/all.js';
    e.async = true;
      document.getElementById('fb-root').appendChild(e);
    }());
</script>
but please don’t forget to change YOUR APP ID to your app id ( you got it in the previous step ).
  • Adding the Open Graph protocol tags:
copy the following code.

<b:if cond='data:blog.pageType == &quot;item&quot;'>
<meta   expr:content='data:blog.pageTitle' property='og:title'/>
<meta   expr:content='data:blog.url' property='og:url'/>
<b:else/>
<meta   expr:content='data:blog.title' property='og:title'/>
<meta   expr:content='data:blog.homepageUrl' property='og:url'/>
</b:if>
<meta   content='MY-SITE-NAME' property='og:site_name'/>
<meta   content='http://google.com/help/hc/images/logos/blogger_logo.gif'   property='og:image'/>
<meta content='YOUR-APP-ID'   property='fb:app_id'/>
<meta content='YOUR-FACEBOOK-PROFILE-ID'   property='fb:admins'/>
<meta content='article'   property='og:type'/>
and change the colored text to the following,
Change MY-SITE-NAME with the one you want to appear when a user likes a page. (Gil likes Helping on Facebook)
Changehttp://google.com/…/blogger_logo.gif with your blog logo, or remove the all tag if you don’t want it.
Change YOUR-APP-ID with your application ID number.
Change YOUR-FACEBOOK-PROFILE-ID with your own facebook user profile ID.
after making this changes add the above code just before
</head>
now we finished adding the facebook codes to your template, please don’t touch anything and continue to the next step.
Step 5. Adding the Comments Box to your blogger template.
please find the following code.

<data:post.body/>
 
and after it, please paste one of the following codes.
For Light Comments box ( like the one in the demo )

<b:if cond='data:blog.pageType == &quot;item&quot;'>
<p align='left'><img alt='' class='icon-action' height='51' src='https://blogger.googleusercontent.com/img/b/R29vZ2xl/AVvXsEgxg1pwCI6LAik04-deVw0wc4-WEjoWzCnQkyDN4KTe0AFU_mj3nHmjkcQq0vYyD1GuLxxnUaCCa3UWUtDW44NYtptAwjfB6bnbs_RrY5nWijExIkeWkRdXRah_qUMZOOe5Q37TffECJ6c/' width='331'/></p>

<script src='http://connect.facebook.net/en_US/all.js#xfbml=1'/>
<div><fb:comments width='450' expr:title='data:post.title' expr:href='data:post.url'   expr:xid='data:post.id'/></div>
<div style='background-color: #f2f2f2;border: solid 1px #cccccc; font-size:10px; padding:3px;width:100%;'> <img alt='' class='icon-action' height='16' src='http://allblogtools.com/imgup/1-2010/allblogtools-blogger-templa.gif' width='16'/> <b><a href='http://www.allblogtools.com/' target='_blank' title='blogger templates'>AllBlogToolsFacebook comments for blogger</a>  brought to you by <a href='http://www.allblogtools.com/' target='_blank' title='blogger templates'>AllBlogTools.com , Get Yours?</a></b></div>
</b:if>

For Dark Comments box ( If you prefer to display the comments box in a dark colors. )

<data:post.body/>
 
and after it, please paste one of the following codes.
For Light Comments box ( like the one in the demo )

<b:if cond='data:blog.pageType == &quot;item&quot;'>
<p align='left'><img alt='' class='icon-action' height='51' src='https://blogger.googleusercontent.com/img/b/R29vZ2xl/AVvXsEgxg1pwCI6LAik04-deVw0wc4-WEjoWzCnQkyDN4KTe0AFU_mj3nHmjkcQq0vYyD1GuLxxnUaCCa3UWUtDW44NYtptAwjfB6bnbs_RrY5nWijExIkeWkRdXRah_qUMZOOe5Q37TffECJ6c/' width='331'/></p>

<script src='http://connect.facebook.net/en_US/all.js#xfbml=1'/>
<div><fb:comments width='450' expr:title='data:post.title' expr:href='data:post.url' colorscheme='dark' expr:xid='data:post.id'/></div>
<div style='background-color: #f2f2f2;border: solid 1px #cccccc; font-size:10px; padding:3px;width:100%;'> <img alt='' class='icon-action' height='16' src='http://allblogtools.com/imgup/1-2010/allblogtools-blogger-templa.gif' width='16'/> <b><a href='http://www.allblogtools.com/' target='_blank' title='blogger templates'>AllBlogToolsFacebook comments for blogger</a>  brought to you by <a href='http://www.allblogtools.com/' target='_blank' title='blogger templates'>AllBlogTools.com , Get Yours?</a></b></div>
</b:if>

To change the width of your comments box, please change 450 to what ever you want, it’s in pixels,
and now please click Save Template , then check your blog. i wish it looks great and works perfectly.

How TO Add FaceBook Send Button To Blogger


Few day ago, face book announced and amazing new button as usual, This time it’s made specially for who loves sharing in private ,
This button features are amazing and it’s completely different from the “facebook like button”
This button allows you visitors (if they logged in FB accounts) to send your blog posts to their facebook friends, there is no need to mention how important is this and facebook for marketing your blog as we all know that facebook already sending blogs thousands of visitors every day. First of all, lets see a demo button on a blogspot blog.
Now lets learn how to do it, and i’ll list the tutorial steps to make it easy and not to make you loos your self into the details and customization,
Don’t worry, the button it self can be added only in 1 step, but for the advanced users, you can apply the additional steps.
  • 1 ) Facebook send button code.
  • 2 ) Facebook send button + Like button code.
  • 3 ) Where to put the button code.
  • 4 ) Customize it’s style ( dark or light )
  • 5 ) Advanced customizations.
1 ) Facebook send button code.
Here is the new send button code if you want to add it alone to your blogger blog.

<!--Add Facebook Send button Start templates-widgets.blogspot.com -->
<script src='http://connect.facebook.net/en_US/all.js#xfbml=1'/><fb:send colorscheme='light' expr:href='data:post.url' font='arial'/>
<!--Add Facebook Send button end templates-widgets.blogspot.com  -->
2 ) Facebook send button + Like button code.
And this is the code that you will use if you want to add like + send buttons together.

<!-- Add Facebook Send button Start templates-widgets.blogspot.com -->
<script src='http://connect.facebook.net/en_US/all.js#xfbml=1' type='text/javascript'/><fb:like colorscheme='light'  action='like'  layout='standard' expr:href='data:post.url' font='' send='true' show_faces='false' width='450'/>
<!-- Add Facebook Send button end templates-widgets.blogspot.com -->
3 ) Where to put the button code.
 Warning : Before you start applying any changes to your blogger template code, We encourage you to Backup it, by clicking on Download Full Template link.
After you decide which code you’ll use, it’s the time to choose where you’ll put it on your blog.
Actually there are two options for you to put your button at, Below the post title, Or After the post body.
Now go to your blogger account, Navigate to, Dashboard >> Design >> Edit Html .
Click on expand template widgets
And now follow the next step.
To place the code below your post title, at the top of your post,
Please find the next code in your template,

<div class='post-header-line-1'>
Or
<div class='post-header-line-1'/>
 
And paste the code after it,
Now if you want to put your button below or after your post body, Please find the following code,

<div class='post-footer'>
Or
<data:post.body/>
 
And paste the code After it.
Now click Save Template
And you are done, now go to your blog to preview your new button,
Or if you want to customize your button, or see some advanced features, please continue reading this detailed blogger tutorial.

4 ) Customize it’s style ( dark or light ).
Now if your blog template, don’t look good with the light button, Just change this code in the above codes,
colorscheme='light'
to the following code
colorscheme='dark
 
5 ) Advanced customizations.
Now What it you want to make the button only appear inside your posts and not on your blog pages / archives / labels pages,
put the following codes above and after the button codes.

<b:if cond='data:blog.pageType == &quot;item&quot;'>
The_Button_Code_Here
</b:if>
 
The following customizations for (Send + like) code. so if you piked the send only button skip this part.
How to change (like) to (recommend).
Find the following part in the button code.
action='like'
To the following
action='recommend'
hide Who liked the post and show only the number of likes.
Just find the following part at the button code.
layout='standard'
And change it to
layout='button_count'
And that’s it,
I wish i covered most of this new button customizations, and for sure if there any updates, i’ll post it here.

10 Facebook Widgets and Tools for Your Website and Blog


Facebook is the largest social networking site with more than 400 million active users and is growing larger every day! Make sure to use these Facebook widgets for your website or blog to connect with your large Facebook audience. You can use these tools to easily share certain profile information, websites, blogs, and businesses with the Facebook community.


Personal Profile Widgets

Like Badge
Display your Facebook pages for all to see.

Profile Badge
Create a Facebook profile badge to share selected profile information on your website. A profile badge will allow your users to easily connect with you and add you as a friend.

Photo Badge
This photo badge allows you to share your Facebook photos on websites and blogs. Choose from a vertical, horizontal, or two-column layout and also choose the number of photos to be displayed.

Basic Widgets for Website or Blog

Like Box
This allows your users to publish their content and activity to Facebook.
Share Button
A powerful facebook widget which allows your visitors to share your content on Facebook! An excellent Facebook widget for blogger.

Page Badge
Lets you share your Facebook page (one that you have created) information on your website.

Twitter Link
Connect your Facebook page with Twitter. Whenever you update your Facebook page, your twitter followers will be updated as well with a tweet. A great Facebook widget for your website!

Developers Widgets for Website or Blog

Like Button
Allows facebook users to share web pages from your website on their profile.

Comments Box
Lets your users comment on your website content with their Facebook account.

Recommendations
Provides your website users with personalized suggestions for pages to visit.

Live Stream
Lets Facebook users to post and share content in real-time.

Activity Feed
Lets users know what their facebook friends are doing on your website through comments and likes.

Login Button
Displays a login button along with profile pictures of facebook friends who have already signed up.

Facepile
Shows profile pictures of people who have liked your facebook page or have signed up for your webpage.

Registration
Another way for users to sign up for your site.

Best SEO Sites for Increased Traffic Tips


As many of you know, Search Engines are the most substantial source of traffic for almost any blog on the web. The blogs without any traffic from Google will never have the chance to be shared with the world. In order to increase your traffic, you must optimize your blog so that Search Engines are attracted to it. Which is also known as SEO (Search Engine Optimization).
So here is a list of useful SEO sites where you can learn how to harness the power of google.


The List

Courtney Tuttle
Join Courtney's Internet Marketing School and you will definitely gain vital knowledge when it comes to search engine optimization.

The Keyword Academy
This is personally my favorite SEO site run by Courtney Tuttle and Mark Butler. You'll learn more in one of their posts than you will in 50 of Darren Rowse's Posts.

Grizzly's Online Blog
He's got some great strategies for making an income online along with useful SEO tips.

Search Engine Land
Search Engine Land is a hub for news and information about search engine marketing, optimization and how search engines work for searchers.

Daily Blog Tips
Improve your blog with Daily Blog Tips. A fast paced blog featuring articles on blog design, SEO, promotion, monetization and more

Matt Cutts: Gadgets, Google, and SEO
talk about Google, SEO, and Gadgets. But mostly Google.

SEOmoz
Search Engine Marketing News & Tips

Search Engine Journal

Pronet Advertising
Pronet Advertising is a weblog about Neil Patel's personal experiences in online marketing.

Search Engine Guide
The small business guide to search engine marketing. Articles from the top names in the industry cover topics including SEO, PPC, SEM, blogging, social media, adsense, adwords, Google, Yahoo, MSN and Internet marketing.

Online Marketing Blog
All about the intersection of search engine & social media marketing

Marketing Pilgrim
Andy Beal discusses news from the search engine industry, blogging, rss and other internet marketing.

Search Engine Watch
Search Engine Watch provides news and tips about search engine marketing (SEM), search engine optimization (SEO), and searching the Web. We offer daily news & analysis of the search industry, including the latest on Google, Yahoo, Microsoft and Ask.

Get Elastic
Ecommerce articles on internet retail, online marketing, social media, SEO, and killer ecommerce tips from Elastic Path Software; Featuring the Get Elastic ecommerce podcast - conversations with ecommerce industry insiders.

Web Analytics World
Manoj Jasra's insight on Web Analytics and the Search Marketing Industry. Also including Interviews, Technology Reviews and Podcasts

BlogStorm
Search engine optimization & internet marketing blog

Small Business SEM
Small Business SEM by Matt McGee | SEO and Marketing Discussion for Small Businesses

SEO Scoop
SEO Scoop is a popular search engine optimization blog that focuses on SEO tips, theories and news.

Search Engine Roundtable
Search engine optimization news and resources

Monday, June 6, 2011

Battle Los Angeles (2011) Hindi Dubbed Blue Ray Rip | Full Movie


Released : 2011
Genre : Action | Sci-Fi | Thriller
Starcast : Aaron Eckhart, Michelle Rodriguez and Bridget Moynahan
Desc :
For years, there have been documented cases of UFO sightings around the world – Buenos Aires, Seoul, France, Germany, China. But in 2011, what were once just sightings will become a terrifying reality when Earth is attacked by unknown forces. As people everywhere watch the world’s great cities fall, Los Angeles becomes the last stand for mankind in a battle no one expected. It’s up to a Marine staff sergeant (Aaron Eckhart) and his new platoon to draw a line in the sand as they take on an enemy unlike any they’ve ever encountered before.
Duration : 110 mins


Battle Los Angeles (2011) download links
Battle Los Angeles (2011) links
Battle Los Angeles (2011) movie download links
Battle Los Angeles (2011)
Battle Los Angeles (2011) Hindi

Cramit Single Link-

Download Now
Size 345 mb


Mediafire Download Links-

Part I

size: 125 mb

Part II
size: 125 mb

Part III
size: 95 mb

Password- world4free.in

Angry Birds : Rio (2011) PC Game [Mediafire]


Info:
Release Name: Angry.Birds.Rio.v1.1.0.cr@cked
Release Date: 01 06 2011
Languages: Eng
Platform: PC
Format: EXE
Size: 33,30 MB

Description:

The Angry Birds have been captured, caged, and taken to Rio! There they meet new friends, and work together to make their escape from a desolate grey
warehouse to the lush green jungle. Help the Angry Birds escape and beat their captors by bombarding the evil marmosets and smashing all obstacles in the way!

Installation Instructions-
1)Install: AngryBirdsRioInstaller_1.1.0.exe
2)Copy Patch.exe
3)Paste to your installation folder - Example:C:\Program Files\Rovio\Angry Birds Rio
4)Run the Patch
5)there are some option PATCH | BACKUP | EXIT
6)Choose PATCH
7)After sucess patch the game
8)Double Click AngryBirdsRio.exe
9)If you want active it Full Version
Use This serial key-
THET-ALEV-LEFR-USWO


Angry Birds Rio (2011)
Angry Birds Rio (2011)Angry Birds Rio (2011)


Mediafire Download Link-

Download Now
size: 33 mb


Cramit Single Link-

Download Now
size: 33 mb
Serial Key-
THET-ALEV-LEFR-USWO

Ready (2011) DvdScr Rip Full Movie


Released : Jun 3, 2011
Genre : Action, Comedy, Drama, Romance
Starcast : Salman Khan, Asin, Aarya Babbar, Paresh Rawal, Mahesh Manjrekar, Akhilendra Mishra, Puneet Issar, Manoj Joshi, Sudesh Lehri
Desc :
Ready is a romantic-comedy set in Mauritius. It is a story about Prem and Sanjanna who fall in love amidst a twisted plot of greedy uncles who want to gulp down Sanjanna`s family inheritance and Prem`s crazy family who always form a part of their only son`s plans. Comedy is essentially a part of the various schemes and conspiracies both parties plan to teach each other a lesson. But what happens when Sanjanna`s family find out they`ve been tricked? Revenge takes over their minds which lead to yet another series of plotting and adventures for both families.
Duration : 02:20:37


Ready (2011) Full Movie
Ready (2011) dvdrip movie
Ready (2011) screen shots
Ready (2011)screen shots


Cramit Single Link-
(Dvd Scr Link)

Download Now
size: 691 mb


Mediafire Download Links-
(Dvd Scr Links)

size: 187 mb

Part IIsize: 187 mb

Part IIIsize: 187 mb
Part IVsize: 131 mb

Password- world4free.in

Mediafire Download Links-(Pdvd Links)

size: 99 mb

Part IIsize: 99 mb

Part IIIsize: 99 mb
Part IVsize: 99 mb

Part Vsize: 99 mb

Part VIsize: 99 mb

Part VIIsize: 96 mb

Password- world4free.in

Teen Thay Bhai (2011) DVD Rip Full Movie


(Links Updated, Now With Best Quality Print)


Released : Apr 15, 2011
Genre : Comedy
Starcast : Om Puri, Shreyas Talpade, Deepak Dobriyal
Desc :
3 Thay Bhai is a comedy film about three brothers who hate each other. It talks about how they have to spend a night together and what happens during the night.

Duration : 1:54


Teen Thay Bhai (2011) dvdrip movie
Teen Thay Bhai (2011) Full Movie
Teen Thay Bhai (2011) links
Teen Thay Bhai (2011) screen shots
Teen Thay Bhai (2011) download links


Cramit Single Link-

Download Now
size: 698 mb


Mediafire Download Links-

size: 199 mb

Part IIsize: 199 mb

Part IIIsize: 199 mb

Part IVsize: 96 mb

Password- world4free.in